Showing posts with label hand made cards. Show all posts

Saturday, February 11, 2012

Hand Crafted Hearts

Print this graphic to paste on your hand made paper hearts.

Today I would like to share how you can make some hearts using simple materials without having to buy scrapbook embellishments.


This is table scatter made by cutting hearts from white construction paper. They will all be different and they look good with the paper doilies.

These paper doilies have become harder to find, and more expensive in just the last week. Also, there are only 6 of the smaller doilies in the package, so it  makes more sense to use construction paper. If you are not familiar with hand making hearts, here is a pictorial instruction section you can follow.

Select the color of paper you like from the children's construction paper, or just use your printer paper. Fold it in half the long way and tear it off. Construction paper tears easily and straight if the fold is good.  Then take each half and fold it and tear it in half again. You will have four strips of paper like this.

Fold each strip in half the long way.

Draw small, medium and large half-hearts on the fold, as you see on the paper above.
Cut each one out, on the fold.

This is what they look like. Don't worry about the fold in the middle of the hearts, as they are supposed to look that way and it makes them more interesting, as they pop up a little.  You can use the piece of paper with the heart holes in it for another project, by gluing it on to a piece of contrasting paper. It might make a card or some kind of banner. This white one would look good with pink in the centers. All that is necessary is to cut a piece the same size and glue it underneath the open hearts.

I interspersed the store-bought doily hearts with the hand made heart scatter.


Now here is a way to make heart doilies yourself.

First cut out a heart on folded paper.

Open it up.

Cut around the heart with deckle-edge scissors; the kind that have shaped blades.
Fold the paper again and cut out a heart from the center if you like. Save it for now. Using a hole puncher, make holes around the edges, so that it looks like the lace doily you buy at the store. Glue your lace heart on to the pink construction paper, and cut it out again, cutting around the scalloped edges to make another lacy edge, Cut a fourth to half inch larger than the white doily, to make the pink paper show around the edge.

This next one is a way to make a lace heart if you do not have fancy scissors (which actually can be found at the dollar store) or a hole puncher.

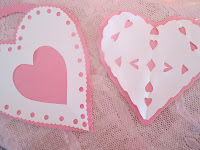
Cut out a heart. Fold it in half and then fold the top and ends toward each other.  Cut shapes of hearts and diamonds all around the edges and the folds. Save the pieces that fall from the cutting.


Glue it on a contrasting color, and cut out again, leaving a border of the pink and cutting it to follow the pattern around the edges of the white heart.

For the one on the left, cut smaller hearts of graduated sizes to put in the middle. For the one on the right, glue  smaller paper hearts, on the folded sides in various places.  Click on for a larger view.


Glue some cut out hearts on their sides, to the Valentine. Cut out a paper hanger to paste to the back if you like.

If you print out the graphic at the top on card stock you can cut it out and glue it to the middle of the white heart.


Tuesday, June 14, 2011

The Lily Pond


The Lily Pond
by W. Ashburner, 1882-1932

Painting Description: Wearing a long blue gown, and holding up one side of the hem, a woman stands the lowest step in front of a lily pond. Her dress is adorned with a white shawl-collar, edged  in a wide ruffle on the shoulders. The collar is tied in the front at the waist. The curved stone stair step leads behind her through a gate opening, and the entire background of the painting consists of foliage with dark pink flowers. The water shows a slight blue reflection of the gown, as the woman casts her glance downward to see the lilies.

Here are a couple of ways to create home made cards and letter-writing materials:


To make these you will need some pages from a daily removeable page picture calendar, some heavy paper or card weight paper, scissors and glue.  Match up the pictures to the card and glue in place.


Since the inside is blank, write on it as though you were writing a letter, and use the back, too. Or, just stamp your greeting, if you have one, that fits the occasion.


Using decorated stationery might develop your interest in writing letters.
Decorate blank paper to make special writing paper by rubber stamping various areas around the paper, and then placing a ruler on the straight edge of the paper. Draw lines with co-ordinating crayon or special pens just to join the images, like this:

It nicely frames your letter with a lovely border.

Saturday, April 02, 2011

April Paper Craft: Egg Cards


by John O'Brien American 1951-2004


These egg cards are quite easy and fit nicely into a square envelope. You can buy a box of pastel envelopes of this size at Walmart or the Dollar Tree.  In the above photograph you see the card, a smaller, gift-enclosure card, and a gift tag with a hole punched.  Each one is decorated with a rose image cut from Anna Griffin scrapbook card-stock.  The paper used is regular print type card-stock, in white. Write your greeting on the inside of the card.


Here is a pink set, including some smaller eggs (pattern included), which can be used for table confetti, or as interesting enclosures for the card. I've put the K&C butterfly stickers with the same shade of pink on each egg card. K&C is an English company and you can find the stickers at JoAnnes. Often they are reduced in price or you can use a coupon to get them nearly half price.

You can make your own butterfly clip art by cutting several layers of a hand-drawn butterfly, and putting them together with special tape.
Here is a set of blue cards from the parchment marbled card stock shown below, using Dollar Tree stickers.


From right to left: parchment marbled pastel card stock, Anna Griffin printed scrapbook card stock, and K&C stickers. It is not necessary to buy anything for these cards. Just use what you have, and cut decorations from bulb and seed catalogs that have good quality paper. This projects looks good made with children's construction paper, too.


The Anna Griffin pack is printed on each side of the paper, so the card will open up to another color. This is one of the prints from that stack.


Click on the patterns for a larger view, and then on the window that pops up, click "save." Save this to your pictures and then print on card stock. It is difficult to trace around a paper print-out, so I would recommend you use a heavy paper like card stock. Cut out the templates and trace around them with a pencil on your favorite papers.  Cut out and decorate with stickers and other things, even sewing notions such as little ribbons and rosebuds.

If you do not want to purchase envelopes to fit this craft, or cannot locate them in any store, here is a pattern you can use. Print or paste it onto a heavier piece of paper or card stock, and use it as your template. Trace around it on thin scrapbook paper or computer paper. Make envelopes to match the color of the cards.


Here is a picture of some of the ideas I had for these cards, using scrapbook paper. One of the eggs on the printable template page is slightly smaller, so that you can put it on a larger egg and make a border around it, as you see on the card below.

See more of John O'Brien's paintings here.

These new bulbs appeared to brighten the overcast days.

Something else new is  lightweight coat I have been sewing, for spring or autumn:


Butterick 5425

This pattern recommends using a light-weight wool. I made mine in a thin, inexpensive fleece. The pattern is made for a lined coat, but you can skip this if using fleece and you just need a spring coat that will not be too heavy.  It has a close fit, so you may need to sew a muslin copy first to try on.  This is is for an advanced seamstress.  Buy a pattern like this when the fabric store has a 99-cent sale.  This is not a good sewing project for beginners.


Pink fleece dress-coat with princess seaming and stand-up collar. It has a detachable hood.  The cost of fabric and buttons, all purchased at a discount, was approximately $25.00. 

These are the buttons that will be used on it:

Sometimes these can be purchased at a discount by using a coupon from the fabric store which gives 50% off your total purchase.

The coat would look nice in other pastels like blue, yellow or green, and also in white.

Wednesday, February 02, 2011

Recycling Calendar Art


Catherine Klein, "Red Rose"


A previous post featured a printable calendar with Victorian roses. It is a new month now, and I wanted to share what I did with last month's rose picture. I suggested that the calendar be printed on cardstock, leaving the other side blank, so that it could be recycled into cards and clip art.

Cut out the picture from last month. It will fit the long business-size envelope just fine.


Place the card on folded cardstock, centering and cutting to fit the envelope. There will be a strip left over that could be rubber stamped or decorated in some way to use as a bookmark, which you might enclose in the card.

Here is the completed card, with some added  Stickles glitter on the tips of the rose petals. It is also sprayed with a bit of glimmer mist, which you can't see, but looks really nice in real life.  You can cut pieces to fit envelopes, from the large calendars you buy, and place them on matching papers for cards. 

Monday, January 31, 2011

Easy Valentines


These paper hearts consisting of only cardstock, paper and clip-art from old cards take very little time. They are only one layer and the greeting is written on the other side. They look as though the roses are printed straight on the card, but they are cut out and glued on with ordinary glue. Click on for a more detailed view.


This has to be my favorite, made with a piece clipped from an old card. Cardstock, on which it is  glued, can be cut with any kinds of scissors, including children's scissors.


No, this is my favorite. It is just a little card on a white background, glued on.


The large rose has been cut out of a scrapbook paper, and the handle for hanging comes from a scrap left after cutting the shaped edging. Just two pieces, plus a dot of liquid paper-glitter, makes this very easy.


The pattern for these hearts are in the previous post. You can also use fabric to decorate with, by tracing around your card template, cutting it out with fabric scissors, and applying the cloth shape to the cardstock heart with a glue-stick. The liquid glue does not work as well with fabric-on-cardstock as well as the office glue stick. I've used a punch to make holes to insert ribbon for hanging.


I have changed my mind about my favorite, for I believe the above is really my favorite, and it is very simple. Just cut the edges with deckle scissors (sometimes available at dollar stores and discount stores), then cut out a piece of clip art with scissors that will cut details, glue on, add liquid glitter, and there you have it. Please be sure to click on for a larger view. This one is cut of cardstock, like the others.


You can either clip out the rose in detail, or leave it as is and apply to the card as you see above.


These are all made with red construction paper and they look great on a plate for a centerpiece at a table. A slightly smaller white heart, the same shape has been put inside the large heart, and then a picture of a rose put in the middle. The one on the right has a glittered foam heart, applied with white liquid glue.  The clip-art is all applied with Elmer's liquid school glue. The only card that uses the sticky glue stick is the fabric one. I found the liquid white glue to work better with this kind of simple project, but it only needs a tiny bit outlining the piece, and then pressed firmly with your fingers.  These pretty hearts fit inside the long business style white envelopes.

Some of the clip art is available on Victorian clip art sites.